The Clock Jobber's Handybook
By Paul N. Hasluck
Brought to you by:
Tick Tock Productions ™
The
CLOCK JOBBER'S HANDYBOOK.
PENDULUMS
THE CONTROLLERS.
CHAPTER V
EXAMINING AND CLEANING A 8-DAY CLOCK
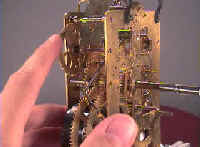
The force of the falling weight is imparted to the wheels, whose motion is regulated by the pendulum so as to produce an equal division of time, which is indicated by the hands upon the dial. The train of wheels is made proportionate to the length of the pendulum. The use of the striking train is sufficiently indicated by the name, and the only thing observable at present is that the various wheels must revolve in certain exact proportions to each other for the striking to be performed correctly. It will be advisable to carefully observe the positions of the different wheels of the striking train, and by making it strike several times to learn their action.
The use of the pallets is to receive impulse from the escape- wheel teeth, allowing one tooth to pass or " escape" at each vibration of the pendulum. The cock, supports the pallet arbor at the back and also the pendulum. The pendulum regulates the velocity of the going train in such a manner that the centre wheel revolves once in an hour; and though the vibrations are maintained by impulse received from the escapement, the number of vibrations per hour is regulated by the pendulum's length.
The motion work, is a combination of wheel- work by which the centre-wheel arbor, revolving once every hour, is made to drive the hour-hand, which makes one revolution in twelve hours. The snail which is usually fixed to the hour wheel, though sometimes mounted with a star-wheel upon a socket, and working upon a separate stud, regulates the fall of the rack. It is divided into twelve steps and the falling of the rack tail upon these steps should allow the proper number of rack-teeth to be taken up by the gathering pallet when striking. The lifter is a brass lever that is lifted every hour by a pin in the minute-wheel, and is connected with the steel detent, which liberates the striking train at the proper time.
The use of the rack is to limit the number of blows struck by the hammer upon the bell. The blows increase with depth of the step upon the snail, on which it is caused to fall by the rack spring. The rack-hook detains the rack as it is gathered up one tooth at a time, by the gathering-pallet, or allows it to fall when lifted up out of the way by the detent. The use of the gathering-pallet is to gather up the proper number of rack teeth, and then stop the running of the striking train by catching against a pin which projects from the rack.
Having obtained a good general idea of the mechanism, proceed to take the clock to pieces. Remove the motion-work, and the various parts connected ,with the striking, which are under the dial; pull out the pins which hold the top-plate on, take it off, and remove the wheels. Take off the hammer, tail spring, and the cock, and the clock will be ready for cleaning. For this will be required three hard brushes, some powdered rottenstone mixed with oil, some common whiting, a lump of chalk, a couple of dozen cards bound together with wire through the middle, so as to leave the edges open, a piece of twine, a few pieces of wood (willow, such as is used for barrel hoops, is first rate), a chamois skin or some clean rags. Clean the clock thoroughly with the rottenstone and oil, using one brush; next dip each piece into the whiting and brush it off with another, and with a third brush finish up with the chalk, afterwards cleaning out the holes with the twine and the wood, not forgetting to clean the countersinks for the oil. If there should be any rust on the pinion leaves or other steel work, polish it off with flour emery and oil, on a piece of wedge-shaped wood, or use fine emery cloth, as may be more convenient. Use the card-brush to clean out the teeth, more especially the escape-wheel teeth. Hold the pieces in the chamois skin or in clean rag while finishing off with the whiting.
Workmen have different methods of cleaning a clock, each supposing his own to be best. The one given above will be found as good as any, but some additional particulars may be useful. In brushing the plates, the brush should take one direction only, that is lengthways of the plate, so that the brush marks may appear in straight lines, otherwise the surface will look bad when finished. Rust on the steel work is removed with fine emery, and then rottenstone. Clean off as much as possible of the rottenstone and oil with an old duster; finish with a clean brush wetted with turpentine, and wipe dry with a clean duster.
In cleaning the wheels, care must be taken not to bend the teeth, or any other delicate parts; and not to rub sufficiently hard and long in one place to take off the corners and destroy the shape. Take especial care to clean out the teeth of the wheels, the leaves of the pinion, and round the shoulders of the pivots. The holes in the plates are well cleaned out with thin strips of leather, holding the plates in the bench- vice. Unless the jaws are provided with clams, such as Fig. 20, wrap a duster round the part that goes in the vice, so as not to mark the plates.
When every part is thoroughly clean, it will be ready for " examining." It will now be necessary to make about half- a-dozen " examining pins," which are merely taper iron pins, with a loop formed at one end, affording facility in picking them from the board. The examining pins require to be made about the shape, and are only to be used for this one purpose.
Cut off the required number of pieces of iron wire, and form the loops at the ends, put them one at a time in the hand-vice, and, resting the free end upon the filing block held in the bench-vice, file them to the proper taper. Keep turning the pin round towards you when the file is going in the opposite direction, that is, away from you. When filed to shape, they must be draw-filed with a smooth file, and finally burnished with a flat burnisher. A flat burnisher is simply a smooth piece of flat steel, like a file without teeth, and requires rubbing on the emery stick, so as to produce a grain crossways.
In examining, the first thing to be done is to see that the wheels are tight on their pinions or collets; that they have no bent or injured teeth; and that the pillars are tightly riveted in the back-plate. If a wheel is found to be loose, it must at once be riveted tight, by placing a stake in the vice, and passing the arbor through a hole in it of sufficient size to allow the pinion, or collet, as the case may be, to have a good bearing. Then with a half-round punch and a hammer, carefully rivet it tight, bearing in mind to keep the wheel so that when finished it runs flat. If any teeth are bent they must be straightened,, either with a pair of pliers or by the insertion of a knife,, gradually raising the tooth to its proper position.
Try the pallets and crutch, and see that they are tight or* their arbor. Observe the clicks and click-springs of the great wheels to see that they are sound in their action, and that the great wheels are properly pinned up; neither so tight as to- make it difficult to wind up the clock, nor so loose as to allow the wheel too much freedom, or the click-work insecurity. Examine the pins of the striking pin-wheel, and the shape of the winding squares.
Now examine the wheels and pinions when in their places between the plates. The points requiring attention are the end-shakes, depths, and pivot holes ; also see that the wheels run free of each other and of the plates. Put the great wheel and the centre wheel in, and pin the plates together with examining pins. Try the end-shakes by seeing that there is a fair amount of play between the pivots' shoulders and the plates. It should be just sufficient to allow of easy movement, and no more.
See that the pivot-holes are of proper size, which should be quite a close yet free fit. The best way to test this is to spin the wheels round separately between the plates, when they should turn quite smoothly.
The " depth " or gearing of the teeth is next examined. Try the shake of the wheels in the pinions; if this is scarcely perceptible, the depth is probably too deep; if the shake appears excessive, the depth is probably too shallow. Gently press the wheel round in one direction, pressing the pinion in the other direction, allowing the force exerted on the wheel to overcome that exerted on the pinion. If the depth is either much too shallow or much too deep, the teeth of the wheel and the leaves of the pinion will lock or catch instead of running smooth. If the depth be incorrect, a new pivot-hole must be made. There are two methods of doing this, preference being given to the following : —Broach open the old hole to a fair size, leaving it irregular in shape, so as to prevent the stopping from turning round. Chamfer the edges of the hole, fit a plug, cut it off close to the plate, and rivet it in right with round-faced hammer. With a fine file remove any excess of rivet, making it smooth and level with the plate, and finishing with fine emery cloth and rottenstone.
Mark with a centre-punch, or a triangular point, where the hole is to be made, and drill to nearly the right size. Enlarge the hole with a cutting broach till the point of the pivot will just enter, and then, by using a round broach, increase its size till the pivot runs quite freely. The outside will require chamfering to hold a supply of oil for the pivot. The ordinary form of chamfering tool is a piece of round steel, with a three-sided point at the proper angle to produce a good shaped hollow, and with a ferrule upon it to receive the bow gut produces better results. It is a steel cutting wheel, working freely upon its axis in a slit made in one end of a brass handle. In the other end is a round edged wheel that burnishes. The last chamfering tool is twirled between the fingers.
It is always necessary, when a new hole has been put in, to try the wheel in by itself, and see that it runs free, resting on both plates. If, upon trial, it is found to have no end-shake, the best way is to free it with a sinking-tool. It is a chisel- shaped cutter, with a brass guide-pin in the centre. Put this guide-pin in the pivot-hole, and a few strokes of the bow will remove enough to give the necessary freedom. Particular attention must be given in putting new holes not to get the wheels out of upright.
The depths and end shakes being now right, notice that the tail of the click and the click-spring are free of the centre pinion, and then proceed to examine the centre wheel and third pinion in a similar manner. Suppose one of the pivots is found to be much too small for its hole, being worn or " cut" very badly, with a rough, uneven surface, instead of a smooth and straight one. The pivot must be " run "—that is, filed and burnished down until it is smooth and straight, and a new hole put in the plate, as explained on page 105. Having rectified any errors found to exist with the centre wheel and third pinion, examine in a similar manner the third wheel and escape pinion, and correct if requisite.
The escapement is next taken in hand, and is the most important part of the clock. The form which is usually found in eight-day English clocks, and in all ordinary house clocks, is known as the " recoil," so called from the action of the pallets producing a certain amount of backward action of the escape wheel, and more or less throughout the train. It is also termed the " anchor " escapement, from the fancied resemblance of the pallets, as originally made, to an anchor. Its chief fault is its sensibility to variation of force in the train; but it is strong, not easily damaged nor deranged, does not require very great exactness in its construction, and is therefore cheap. Its performance, when well made, is such as to give satisfaction to most people.
_____________________________________________________________________________
Learn clock repair with these DVD courses! Course manuals are included.
Watch, study and learn antique clock repair through DVD course instruction using actual live repairs!!
Clock Repair 1 & 2 Advanced Clock Repair PRO advanced clock repair
Clockmaker Watchmaker Lathe Basics Clockmaker Watchmaker Lathe Projects Clock Case Repair & Restoration Wooden Works Movement Repair
© Copyright 2001-2009 by Tick Tock Productions © Copyright 2001-2009 by John Tope All rights reserved.
Back to clock information page.
Hasluck, Paul N. The Clock Jobber’s Handybook. London: Crosby Lockwood and Son, 1889.
This and the following pages are excerpts from the book.